Slide walkthrough · 2 min read

Invite an adult learner and a guardian: two short walkthroughs

Explore tutorials
Explore step by step5 slides · At your own pace
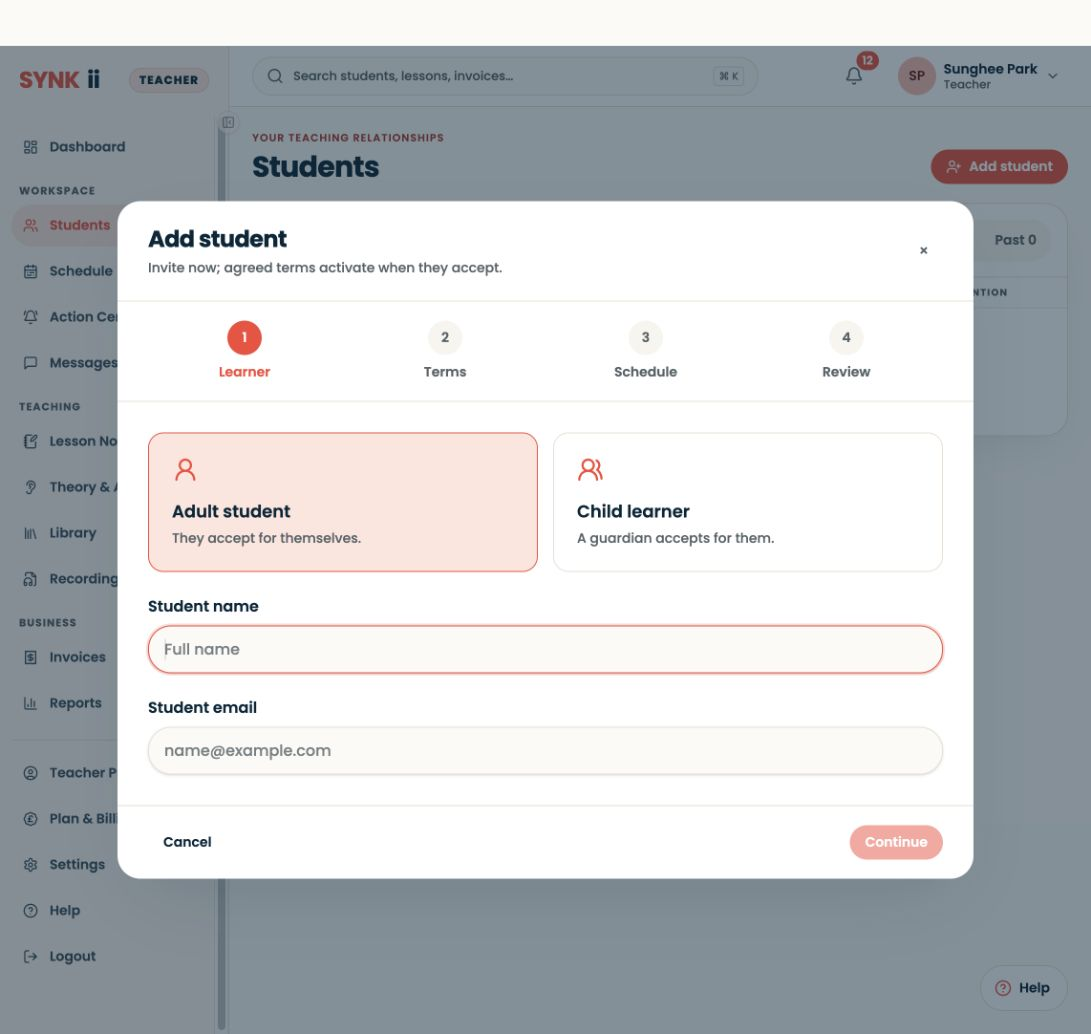
Actual SYNKii interface: Choose the learner. Open Students, then Add student. Choose Adult student when the learner accepts for themselves.
STEP 01

Choose the learner

Open Students, then Add student. Choose Adult student when the learner accepts for themselves.

Enlarge screenshot
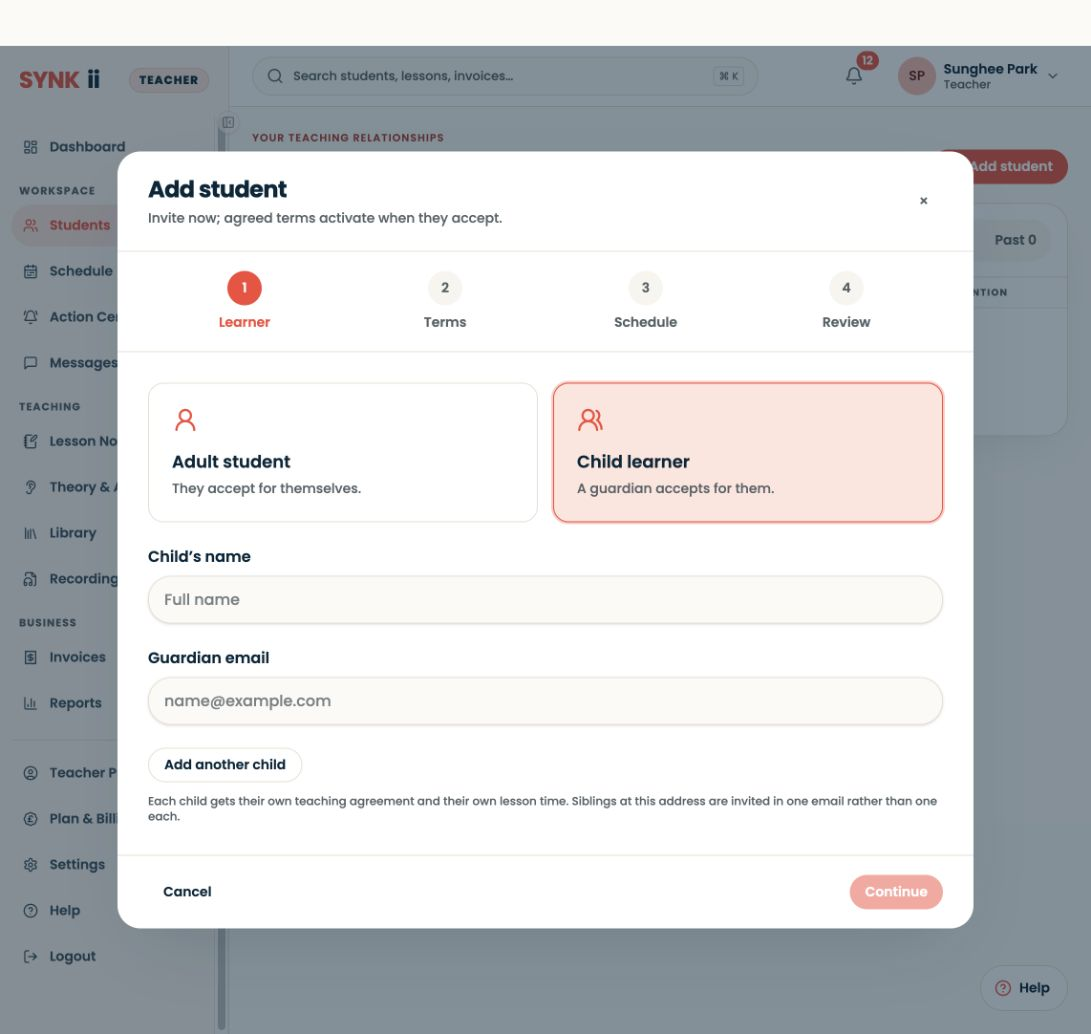
Actual SYNKii interface: For a child, invite the guardian. Choose Child learner. Enter the child’s name and the guardian’s email in their separate fields.
STEP 02

For a child, invite the guardian

Choose Child learner. Enter the child’s name and the guardian’s email in their separate fields.

Enlarge screenshot
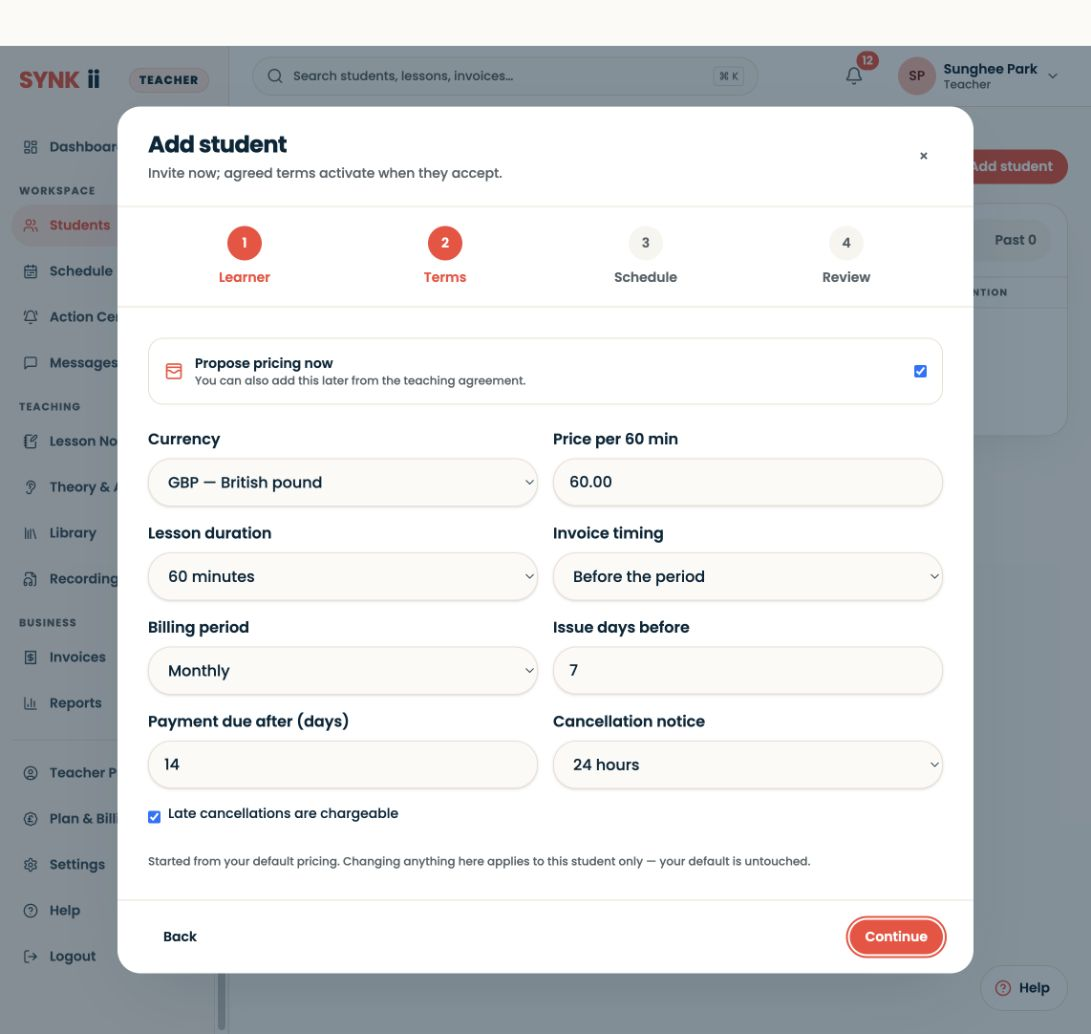
Actual SYNKii interface: Review your proposed terms. Check price, lesson length, billing and cancellation terms. These are lesson fees, separate from the SYNKii subscription.
STEP 03

Review your proposed terms

Check price, lesson length, billing and cancellation terms. These are lesson fees, separate from the SYNKii subscription.

Enlarge screenshot
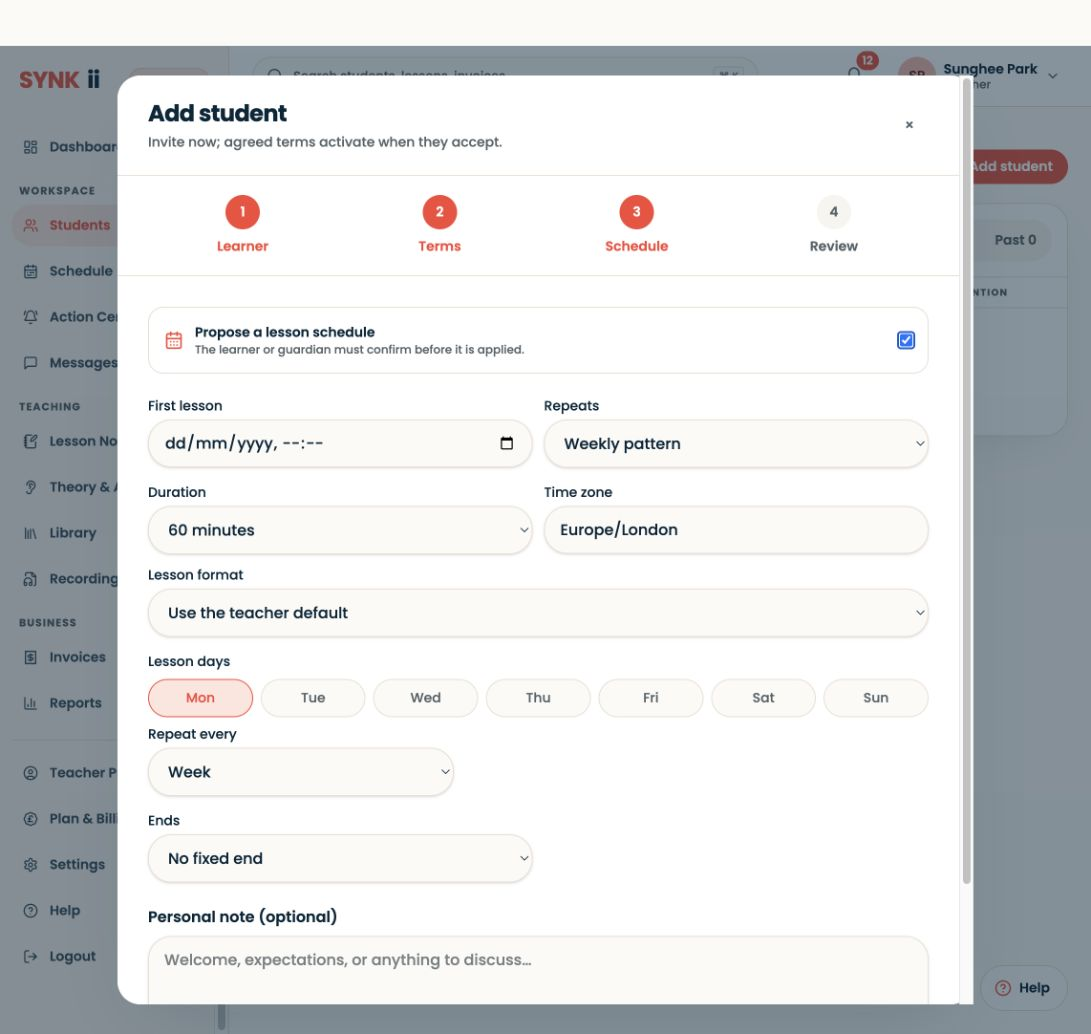
Actual SYNKii interface: Propose a lesson time. Optionally add a first lesson and repeat pattern. The learner or guardian confirms the proposal before it is applied.
STEP 04

Propose a lesson time

Optionally add a first lesson and repeat pattern. The learner or guardian confirms the proposal before it is applied.

Enlarge screenshot
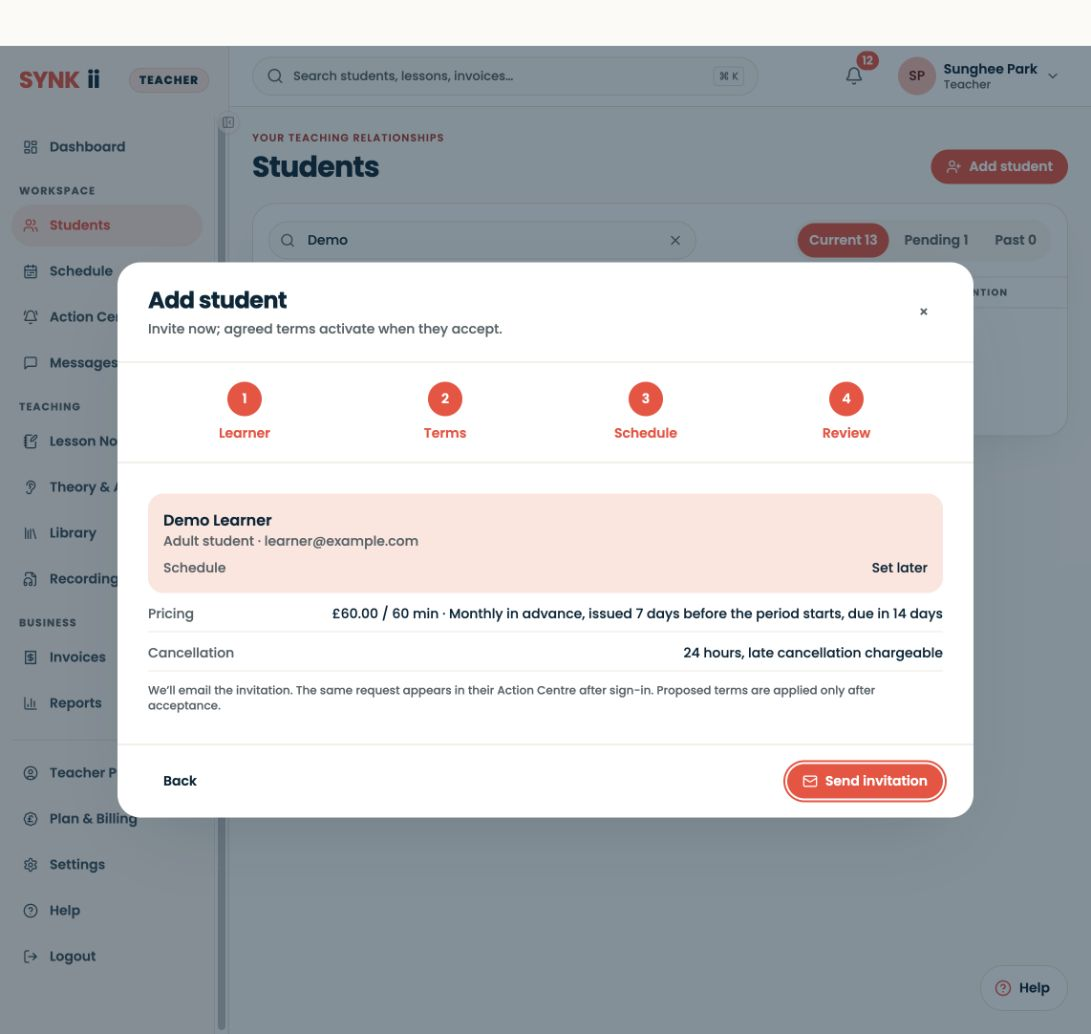
Actual SYNKii interface: Check before sending. Review the recipient and arrangement. This fictional example stops here: no invitation was sent. Acceptance happens after sending.
STEP 05

Check before sending

Review the recipient and arrangement. This fictional example stops here: no invitation was sent. Acceptance happens after sending.

Enlarge screenshot

Adult learners and guardians · Actual platform captures · September 2026

These five slides use actual SYNKii staging screenshots captured in September 2026. Explore invitation setup at your own pace, using fictional details. The walkthrough stops before sending; acceptance and the recipient’s account setup are not shown.

Written walkthrough

  1. Open Students → Add student. Choose Adult student when the learner accepts for themselves.
  2. For a child, choose Child learner and use the separate Child’s name and Guardian email fields.
  3. Review the proposed pricing, duration, billing and cancellation terms. These are your lesson fees.
  4. Optionally propose a lesson schedule. The recipient must confirm it before it is applied.
  5. Review the recipient and arrangement before Send invitation. Our fictional example stops at review and sends nothing.

After a genuine invitation is sent, the learner or guardian still needs to accept. Check the relationship status before assuming access is active.

Step-by-step explanation

Adult example — invitation form. “For an adult learner, the learner is the person accepting the teaching relationship. I check the name and email before sending.”

Child example — guardian details. “For a child, I use the guardian route. The learner’s details and the adult’s contact details are distinct.”

Terms. “Check the proposed lesson price, billing and cancellation arrangements.”

Schedule. “Propose a first lesson and repeat pattern now, or leave scheduling for later.”

Review. “Check the recipient before sending. Our fictional example stops here. An invitation is not active access yet: the recipient still needs to accept.”

Capture notes

Captured from the real staging interface on 28 September 2026. The example uses the reserved address learner@example.com. No live invitation token, student record or acceptance screen is included.

End card: “Choose the learner route. Check the recipient. Confirm acceptance.”

Read the complete invitation guide.